ToyOS Development Journal - 1
This development journal collects my study notes when I develop toyOS following Viktor Engelmann’s writting your own operation system tutorial series.
ToyOS is a toy project for tutorial purpose. In this article, I will cover how to setup the environment and how to write a simple boot program.
Development Environment Setup
The first thing we should do is to set up development enironment and buinding tools.
- Install Ubuntu
- Install building tools, emulator and other necessary packages
sudo apt update && sudo apt upgrade
sudo apt install build-essential # building tools including g++ make and bintils which we are going to use
sudo apt install qemu # emulator inside virtualbox
sudo apt install xorriso # install newest version for iso file generating
# EFT boot system not using virtualbox or other virtual machine
sudo apt install grub-pc-bin # if system use EFI to boot
After the environment setting up, we need to review how an OS was booted up.
Pre-knowledge
-
System booting
As we are writing operation system, we need to know what happened after the power key was pressed. The figure1 below demonstrate the main process of linux booting.

-
System startup
-
1.1. Power-up Sequence state: The power will supply components in a restrict order.
-
1.2. BIOS state: There is a pre-burned program in ROM (Basic Input/Output System)
- 1.2.1. Power-On Self-Test: The program will test each hardware and use beeps to report error2
- 1.2.2. Boot Sequence: Then the program will look for the order of devices listed in BIOS that the computer will look for operating system information on.3
/boot-options-cd-first-56a6fa273df78cf772913c9e.png)
-
-
MBR - Master boot record which only contains 512 bytes
At this state, the program will hand over to the matchine code in 1 - 446 bytes. If using grub, stage 1 files will be written into here.
- GRUP
grub files normal includes:stage1、stage2、*stage1_5、menu.lst
- stage1: Located in MBR, it show where to stage2 and other information
- stage2: Located certain location with big space and how when to find menu.lst which link to /boot/gurb/gurb.cfg. We will using it to load kernel.
- Kernel
Then grub will load kernel into memory.
- init
After the kernel loaded, init program will be executed.
Problem Define
To begin with, we will print “Hello World” in the screen in a 32 bit i386 system.
Problem Analyse
According the the boot process above, we need lead MBR to find grub configure file then to load kernel, in the kernel print “Hello world”. We can divide the process into three tasks.
- Grub leading
- We only need to configure /boot/gurb/gurb.cfg file and there are many tools to build grub files.
- Kernel boot - there are two issues we need to handle
- let grub the recognize as bootable code
- Compile C++ to run in a naked PC
- Kernel entry and Print “Hello world”
- most easy part but need to write own print function
To begin with the simplest, we will write a simple “Hello World” in a bare system in c++.
Main entry and printf function
In the naked system, we can not use system call or standard library to print to standard output. we have to write own printf function and compile into a elf32-i386 file format
// kernel.cpp
void printf (char* str) {
    // 0xb8000 is the text screen video memory for colour monitors
    // The lower byte is for foreground and background color the high byte for character
    static unsigned short* VideoMemory = (unsigned short*)0xb8000;
    for (int i = 0; str[i] != '\0'; ++i) {
        VideoMemory[i] = (VideoMemory[i] & 0xFF00) | str[i];
    }
}

// extern "C" let compiler does not mangle the name
// which means in assemble we can still use toyMain as function name
extern "C" void toyMain () {
    printf("Hello World");
    while(1);
}
Then we need to compile kernel.cpp into object file
g++ -m32 -fno-use-cxa-atexit -nostdlib -fno-builtin -fno-rtti -fno-exceptions -fno-leading-underscore -o kernel.o -c kernel.cpp
Then we find the symbol table of kernel.o
nm kernel.o
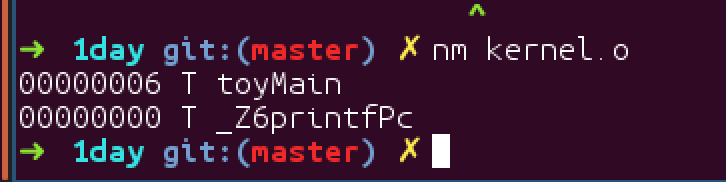
As can been seen above, toyMain is visible for the boot program now.
Task 2 write boot program
In this task, there are two problems we need to deal with:
- Tell grub “I am real kernel, load me” so we need to achieve below subtasks
- put a magic number into program to indicate “I am kernel” for grub
- putverify flags in case magic number appears into program to demonstrate “I am real kernel”.
# load.s for booting up kernel
# set compile variable
.set MAGIC, 0x1badb002
.set FLAGS, (1<<0 | 1<<1)
.set CHECKSUM, -(MAGIC + FLAGS)

# self defined multiboot for grub
# Tell grub I am real kernel verify me by using
.section .multiboot
    .long MAGIC
    .long FLAGS
    .long CHECKSUM
- Compile C++ to run in a naked PC
- 2.1 setup global constructors and call them before main functions as we are going to use global objects and static objects
According to OS dev 20174, global constructors have to be called before the main function. Destructors have to be executed after it returns. And GCC puts pointers to the constructors in one section called “.ctors” and pointers to the destructors in one section called “.dtors”.
// link.ld
ENTRY(loader)
OUTPUT_FORMAT(elf32-i386)
OUTPUT_ARCH(i386:i386)

SECTIONS
{
    . = 0x01000000;

    .text :
    {
        *(.multiboot)
        *(.text)
        *(.rodata)
    }

    .data :
    {
        // global constructors and destructors
        start_ctors = .;
        KEEP(*( .init_array ));
        KEEP(*(SORT_BY_INIT_PRIORITY( .init_array.* )));
        end_ctors = .;
        *(.data)
    }

    .bss :
    {
        *(.bss)
    }

    /DISCARD/ :
    {
        *(.fini_array*)
        *(.comment)
    }
}
Then we need add constructor init method in kenerl.cpp
// kenerl.cpp
typedef void (*constructor)();
extern "C" constructor start_ctors;
extern "C" constructor end_ctors;
extern "C" void callContructors () {
    for(constructor* i = &start_ctors; i != &end_ctors; i++) {
        (*i)();
    }
}
- 2.2 Finally, we can call cpp function from boot program
# load.s

# programs .text
.section .text
.extern toyMain
.extern callContructors
.global loader # main entry

loader:
    mov $kernal_stack, %esp # save stack top
    call callContructors #init each constructure
    push %eax # multiboot structure
    push %ebx # magic number
    call toyMain

_stop:
    cli
    hlt
    jmp _stop

.section .bss
# 4 M stack
.space 4*1024*1024
kernal_stack:
Final Step
- Now we can configure Makefile to make grub configure files and compile codes together
# Makefile
# g++ should not using system default libs for naked system
GPPFLAGS = -m32 -fno-use-cxa-atexit -nostdlib -fno-builtin -fno-rtti -fno-exceptions -fno-leading-underscore
# 32 assemble
ASFLAGS = --32
# elf format
LDFLAGS = -melf_i386
OBJS = loader.o kernel.o

%.o: %.cpp
	g++ $(GPPFLAGS) -o $@ -c $<

%.o: %.s
	as $(ASFLAGS) -o $@ $<

toyKernel.bin: linker.ld $(OBJS)
	ld $(LDFLAGS) -T $< -o $@ $(OBJS)

# clean
.PHONY: clean
clean:
	rm toyKernel.bin *.o
# boot iso disk with grub configure
toyos.iso: toyKernel.bin
	mkdir iso
	mkdir iso/boot
	mkdir iso/boot/grub
	cp $< iso/boot/
	echo 'set timeout=0' > iso/boot/grub/grub.cfg
	echo 'set default=0' >> iso/boot/grub/grub.cfg
	echo '' >> iso/boot/grub/grub.cfg
	echo 'menuentry "Toy OS" {' >> iso/boot/grub/grub.cfg
	echo ' multiboot /boot/toyKernel.bin' >> iso/boot/grub/grub.cfg
	echo ' boot' >> iso/boot/grub/grub.cfg
	echo '}' >> iso/boot/grub/grub.cfg
	grub-mkrescue --output=$@ iso
	rm -rf iso
# boot iso in qemu
run: toyos.iso
	qemu-system-i386 $<
Conclusion
At this stage, in order to print “Hello World” in a naked i386 32 bits system, we need at least:
- Configure grub
- Put magic number in boot program
- Configure cpp and gas into elf_i386 and call each
Reference
-
IBM 2017, Website, https://www.ibm.com/developerworks/cn/linux/l-linuxboot/index.html ↩
-
Wiki 2017, Power on self-Test, https://en.wikipedia.org/wiki/Power-on_self-test#Original_IBM_POST_beep_codes ↩
-
Tim F 2017, What is Boot Sequence?, https://www.lifewire.com/what-is-a-boot-sequence-2625814 ↩
-
OSdev 2017, Call Global Constructors, http://wiki.osdev.org/Calling_Global_Constructors ↩